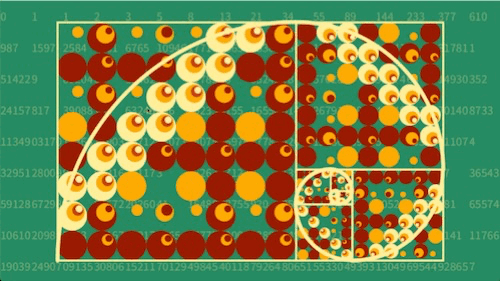
"Pingala", A Fibonacci sequence based generative art piece

About the piece
This was an assignment for my post-grad in computer science at SETU. During the entire course of writing the code for this I had my little 6 month old boy sleeping on my chest as he was quite sick with winter flu/bugs, building up his little immunity. So this was typed with one hand, either my right or left, depending on which side of his face he wanted on my chest at any particular point in time. When he moved his head, I’d pick up my laptop and swap sides. Quite the odd little situation. Dark mode was a life saver. Perhaps I should have named this Single Handed Type or something. That can be its unofficial subtitle.
The spec was to create a generative art piece in Processing using programming fundamentals while requiring us to follow some rather tight constraints, such as no use of arrays, type casting, or any advanced Processing features. It was intended to be a challenge within the confines of what was already covered. As the legendary saxophonist Wayne Shorter said, “you need resistance to fly”.
The Fibonacci sequence and The Golden Ratio
I chose to base my work on a concept I have long been fascinated with, the Fibonacci sequence. It is entitled Pingala, after the Indian mathematician, Acharya Pingala, who was the first to be credited with describing the numbers, around 200 BC in India. Of course Leonardo of Pisa (also known as Fibonacci) ‘discovered’ it for the western world in the 11th century.
I first came across it while learning more about photography, art and composition, as there are countless examples of it being employed (either knowingly or unknowingly) as a compositional tool in visual arts and design. It was then presented to me as an early coding challenge before starting the post-grad, and I was fascinated to find that it was based in something so mathematically elegant.
Simply put, the Fibonacci sequence is a mathematical concept whereby, starting from 0 and 1, you add the newest and previous numbers together ad infinitum. So 0+1 = 1, 1+2=2, 2+1 = 3, 3+2 = 5, and so on. As you can imagine, the numbers become quite large in a surprisingly short period, but they also result in a ratio(between the previous and current numbers) called the golden ratio - 1.618033988.... Much like PI, it is a constant that is often used in a number of disciplines and crops up in a variety of freaky ways in nature, biology, physics and astronomy. I won’t get in to this further as the rabbit hole there gets much too deep!
Regarding the Fibonacci spiral and squares/frames, there are a number of ways to chart them, the simplest of which is to first draw a small square of 1x1, then 2x2 next to it, then 3x3,5x5,8x8 etc for each Fibonacci number... all rotating outward and around each other until you decide you've had enough. An arc is drawn outwards then from corner to corner of each box, resulting in the spiral. This is the compositional tool often used by artists, photographers and designers, either intentional or unintentional, and really does help give their work that extra bit of je ne sais qua, to help make use of positive and negative space, and to draw the viewers eye.
Back to the sketch
I chose to use a combination of the spiral, frames(also referred to as boxes/squares here), and golden ratio to make something that I hope is pleasing visually, but also makes as much use as possible out of the concept. It uses the frame/spiral as a basis compositionally for an irregular grid to display a number of circles inside each other, all sized and positioned based on the golden ratio, with the Fibonacci numbers themselves displayed as a background. I have some simple user interactions built in as well - move the mouse to the upper left quadrant to reveal the spiral and frames, left click to regenerate the colours, and scroll up/down to change the opacity of the fibonacci numbers.
Recursive Fibonacci algorithm
I elected to use recursion for my central function, primarily for no other reason than the challenge of it, although there are some small speed benefits if the algorithm is written correctly.
The most obvious way to calculate Fibonacci numbers is to use a simple for loop, where you save the previous number in a variable and add it back again to the current number, but this would have made my life much too simple and easy!
So, the obvious way to tackle this using recursion then, is where your Fibonacci method takes the passed in number(n), checks for if it’s less then 1 and returns the position if true, or returns the function recursively where the passed in number(n) is n-1 plus the function again, where n is n-2. This has a significant flaw in that it results in exponential time complexity (O(2^n)) because the function is being called recursively twice inside itself, and considering how many times this will be called it is not acceptable to use such an inefficient approach.
Memoization
The solution for this is to store the previous and current numbers returned in the function itself as fields/attributes, and calculate the next number, instead of calling the function twice each time. This results in a standard linear time complexity - O(n), the same as the standard loop, and is actually slightly faster to perform than the standard loop.
Note that this version of the method will only produce numbers up to an integer’s max number of digits, which you actually may hit quite quickly. An overloaded function returning a long would be required to go higher, although in this version I had no need for it.
int fibNum(int fibPosition) {
  if (fibPosition <= 1) {
    return fibPosition;
  }
  return fibonacciHelper(0, 1, fibPosition - 1);
}

int fibonacciHelper(int prev, int current, int fibPosition) {
  if (fibPosition ==  0) {
    return current;
  }
  return fibonacciHelper(current, prev + current, fibPosition - 1);
}
As you can see I set up a function first to handle 0 and 1, which then passes in 0 and 1 as the previous and current numbers along with the position, to the “helper” function, which is the actual recursive function. The helper function then does another check for the final fib position, and returns the current number passed into the previous field, and current + previous passed into the current field, while also counting down to exit the loop.
Drawing the frames/spiral.
I spent quite some time working out how to draw the Fibonacci boxes in a generative way. In an early version of this I had worked out the coordinates of each box and hard coded them, looking for any relationship at all, and finding nothing. Due to the nature of how they spiral in on each other it makes it quite difficult to work out the position of each box. That is until I had a eureka moment - to use translate() and rotate() to shift the position and rotation relative to the previous box in the loop, not relative to the overall sketch’s canvas.
I have isolated the code below to just show what is relative to this section on the frames/spiral, as the ellipses code is also running inside this main loop. Please refer to the GitHub for the full version.
void draw() {
  ....

  int startingFibNum = 15;
  int numOfBoxes = 11;

  translate(0, fibNum(startingFibNum));
  rotate(radians( -90));

  for (int count = 0; count < numOfBoxes; count++) {
    ......
    .....

    noFill();
    stroke(c5Red, c5Green, c5Blue, spiralVisible);
    strokeWeight(5);

    rect(0, 0, fibNum(startingFibNum), fibNum(startingFibNum));

    ellipseMode(CENTER);
    strokeWeight(10);
    arc(0, fibNum(startingFibNum), 2 * fibNum(startingFibNum), 2 * fibNum(startingFibNum), radians( -90), radians(0));

    rotate(radians(90));
    translate(fibNum(startingFibNum), -fibNum(startingFibNum));

    startingFibNum --;
  }
}
Above I’ve given a starting fib number position and a max number of boxes for the boxes/arcs(the spiral). I have elected to start on the biggest box/arc and move the spiral in and smaller, as opposed to starting at the smallest and working outwards, as I found it more intuitive. The initial translate/rotate outside the loop twists the 0,0 x and y position to the bottom left. Then I draw the first box and arc with the starting fib number size.
Imagine taking a big piece of paper sized to the width of the 16tb fib number(987) and height of the 15th(610). This is the canvas for our Fibonacci spiral and boxes. Place another square cut out on top, sized to the width and height of that 15th fib number and scribble a dot in the upper left (to remember our top left position- I actually did this in the code during testing), rotate it to the left 90 degrees, and move it to the bottom left of the bigger piece of paper. Your dot is now what looks like the bottom left of the canvas, but the x and y 0 points are now actually in the bottom left so the orientation of the entire paper has effectively changed. Think of where the dot is as the new top left.
Then in the code inside the loop, I twist the 0,0 x,y again, this time back to the right 90 degrees, to set up the next rect() and arc(). For this second one imagine taking another cut out paper square with a dot in the upper left, sized to the 14th fib number(377), and placing it at our 0,0 coordinates (the old bottom left - remember though this is actually our actual top left, set this way by the initial translate() and rotate()). It should be on top of the previous cut out piece of paper, the dots from the previous box lined up. Then to set its position rotate it 90 degrees to the right, and move the corner with the dot to align with the the bottom right corner of the previous box(our bottom right, it looks like it's the upper right). This will place this particular box about 3/4 way along the width of the canvas, with the right edge of the smaller box lining up to the right edge of the canvas (as the 14th and 15th fib number of course equals the 16th), with the orientation of the entire canvas set back the way it was.
The next iteration then will take another square, sized to the 13th fib number (233), and place it so it’s dot meets the bottom right corner of the previous box, as we’ve rotated 90 degrees to the right again, and set our new 0,0 coordinates to the bottom right of the previous box. Then the next one (12th number, 144) rotates right again and sets x,y to the old box’s bottom right. The dot now looks like it’s in the bottom right of its box, as our canvas is flipped 180 degrees, but it’s, you guessed it, actually now the top left. If you keep going and imagine each iteration it becomes a seriously dizzying head melter of an experiment, but quite satisfying.
Each of these boxes has an arc() drawn from the top left to bottom right inside them. I find the way arc() works in Processing to be incredibly confusing, but think of it really like an oversized ellipse/circle, where you are choosing which part of it to actually draw. In this case imagine each arc as a circle, the center point of which is the bottom left of each Fibonacci square. Its radius is sized the same as the fib square it is inside/relative to, it’s been instructed to only draw a quarter of its actual circumference, and it has no fill so only shows its stroke. Note that if you were to allow it to draw the full circumference of the circle, it would expand far outside each box. Not intuitive, but it works just fine.
Drawing the Fibonacci numbers background
Here I’m simply taking a very long string with the Fibonacci numbers, up to around the 100th (the numbers get extremely high!), splitting the string at the space separating the numbers, and drawing the split string in a cell while looping through each cell of a 16:9 background grid. It also splits the higher fib numbers into separate cells, spreading them out.
void drawFibonacciNumberGrid() {
  fill(c5Red, c5Green, c5Blue, fibNumVisibility);

  String newFibNumbers = fibonacciNumbers;

  // Iterate over 16:9 grid, putting a fib number in each.
  // When the number grows too large for font size, split it and place in next cell
  for (int fibStringRowNum = 0; fibStringRowNum < rows; fibStringRowNum ++) {
    for (int fibStringElementNum = 0; fibStringElementNum < columns; fibStringElementNum ++) {
      int maxCharNum = 5;
      // Iterates over the string of fibonacci numbers to find the spaces separating each number and updating to the new string.
      int fibonacciSpaceIndex = newFibNumbers.indexOf(" ");
      String fibonacciSplit = newFibNumbers.substring(0,fibonacciSpaceIndex);
      newFibNumbers = newFibNumbers.substring(fibonacciSpaceIndex+1);
      // Checks for fib number(in string format) above the max char amount for my chosen font size(5) - hard coded unfortunately
      if (fibonacciSplit.length() >= maxCharNum) {
        int index = 0;
        int fibStringLength = fibonacciSplit.length();

        // Splits and draws first part of number
        String subFibString = fibonacciSplit.substring(index, maxCharNum);
        text(subFibString, fibStringElementNum * (width/columns) , fibStringRowNum * (height/rows), (width/columns), (height/rows));

        fibStringLength = fibonacciSplit.length() - maxCharNum;

        // for rest of the number, iterate and draw the new strings
        while (fibStringLength > 0) {
          index += maxCharNum;

          // Checks if we're on the last part of the string, and applies correct .substring param, or continues
          if (fibStringLength < maxCharNum) {
            subFibString = fibonacciSplit.substring(index);
          } else {
            subFibString = fibonacciSplit.substring(index, index + maxCharNum);
          }

          fibStringElementNum ++;
          fibStringLength -= maxCharNum;

          text(subFibString, fibStringElementNum * (width/columns) , fibStringRowNum * (height/rows), (width/columns), (height/rows));
        }
      } else {
        text(fibonacciSplit, fibStringElementNum * (width/columns) , fibStringRowNum * (height/rows), (width/columns), (height/rows));
      }

    }
  }
}
Some interesting workarounds for the draw() function
I was committed to finding a good way to regenerate the colours using the draw function, but as we were constrained to using any of Processing’s more advanced features, I had to do it in a bit of a verbose way. It’s quite ugly to look at, but does the job just fine.
void setup() {
  size(1280, 720);
  surface.setLocation(0, 0);

  randomColorA = getRandomColor();
  randomColorB = getRandomColor();
  randomColorC = getRandomColor();
  randomColorD = getRandomColor();
  randomColorE = getRandomColor();
  randomColorF = getRandomColor();
  randomColorG = getRandomColor();
  randomColorH = getRandomColor();
  randomColorI = getRandomColor();
}
I can’t call my getRandomColor() method below directly in the draw function due to it constantly changing at the set frame rate, so I had to initiate and run each of these randomColor variables in the setup() function for the initial loading of the sketch, using the below function for selecting a random color from my pallete. Each randomColorX variable gets used in some way in the sketch to create the look of randomness/variety.
int getRandomColor() {
  int r = int(random(5));
  int randomColor = 0;
  if (r == 0)
  {
    randomColor = c2;
  } else if (r ==  1) {
    randomColor = c3;
  } else if (r ==  2) {
    randomColor = c4;
  } else {
    randomColor = invisible;
  }
  return randomColor;
}
Then using the mouseClicked built in function I rerun those same variables on mouse click.
void mouseClicked() {
  if (mouseButton == LEFT) {
    randomColorA = getRandomColor();
    randomColorB = getRandomColor();
    randomColorC = getRandomColor();
    etc....
  }
}
Setting up and drawing the ellipses(circles)
This method draws the ellipse/circle elements in my sketch. I pass in all of the related location and size requirements, along with three of my randomColorX variables, although here they are being referenced as circleColorA, B and C. The function takes in three different colours based on a series of conditionals(in another function called setUpEllipses()) that ensures good color variety around the sketch.
void drawEllipses(float xElementPosition, float yElementPosition, float elementSize, int numOfInnerCircles, int circleColorA, int circleColorB, int circleColorC) {
  ellipseMode(CORNER);

  int circleNumber = 1;
  while (circleNumber <= numOfInnerCircles) {
    // Select color based on location, using modulo operator by amount of colours passed into the method

    if (circleNumber % 3 == 1) {
      fill(circleColorA);
    } else if (circleNumber % 3 == 2) {
      fill(circleColorB);
    } else {
      fill(circleColorC);
    }

    // draw the ellipses
    noStroke();
    ellipse(xElementPosition, yElementPosition, elementSize, elementSize);

    // Make successive ellipses smaller incrementally based on the golden ratio.
    elementSize = elementSize / goldenRatio;
    xElementPosition = xElementPosition + elementSize / 2;
    yElementPosition = yElementPosition + elementSize / 2;

    circleNumber ++;
  }
}
Then in my ellipse set up function I systematically included each of the ‘random’ color variables based on some conditions for the rows and columns. Odd,even and divisible by 3. So it spreads them out a bit. In practice, because there aren’t many different colours available, it can lead to a very plain looking final image, but you can just left click again and you’ll get more variation. The restriction regarding a max of 5 colours we can use in total was an unexpected hurdle.
// Ellipse Element set up and color conditionals
void setUpEllipses(int xElementPosition, int yElementPosition, int elementSize, int rowNum, int elementNum, int numOfInnerCircles) {
  // draw ellipses that are in rough position of the fib spiral, passing static colurs in.
  if (elementSize < fibNum(9) && xElementPosition ==  yElementPosition) {
    drawEllipses(xElementPosition, yElementPosition, elementSize, numOfInnerCircles, c5, c4, c3);
  } else if (elementSize > fibNum(9) && xElementPosition ==  yElementPosition + elementSize || elementSize > fibNum(9) && xElementPosition ==  yElementPosition + elementSize*2) {
    drawEllipses(xElementPosition, yElementPosition, elementSize, numOfInnerCircles, c5, c4, c3);
  }
  // Select colour scheme for rest of elements, based off a number of aesthetically pleasing conditions
  else {
    if (rowNum % 2 ==  0) {
      if (elementNum % 3 ==  0) {
        drawEllipses(xElementPosition, yElementPosition, elementSize, numOfInnerCircles, randomColorA, randomColorB, randomColorC);
      } else if (elementNum % 2 == 0) {
        drawEllipses(xElementPosition, yElementPosition, elementSize, numOfInnerCircles, randomColorD, randomColorE, randomColorF);
      } else {
        drawEllipses(xElementPosition, yElementPosition, elementSize, numOfInnerCircles, randomColorG, randomColorH, randomColorI);
      }
    } else if (rowNum % 3 ==  0) {
      if (elementNum % 3 ==  0) {
        drawEllipses(xElementPosition, yElementPosition, elementSize, numOfInnerCircles, randomColorB, randomColorC, randomColorD);
      } else if (elementNum % 2 == 0) {
        drawEllipses(xElementPosition, yElementPosition, elementSize, numOfInnerCircles, randomColorE, randomColorF, randomColorG);
      } else {
        drawEllipses(xElementPosition, yElementPosition, elementSize, numOfInnerCircles, randomColorH, randomColorI, randomColorA);
      }
    } else {
      if (elementNum % 3 ==  0) {
        drawEllipses(xElementPosition, yElementPosition, elementSize, numOfInnerCircles, randomColorC, randomColorF, randomColorI);
      } else if (elementNum % 2 == 0) {
        drawEllipses(xElementPosition, yElementPosition, elementSize, numOfInnerCircles, randomColorB, randomColorE, randomColorH);
      } else {
        drawEllipses(xElementPosition, yElementPosition, elementSize, numOfInnerCircles, randomColorA, randomColorD, randomColorG);
      }
    }
  }
}
Conclusion
This was an exciting and expressive project to take on. I think I was pleasantly surprised that coding an "art" piece would feel so satisfying creatively. Using code to generate a piece of art might not exactly compare to painting with brush and canvas, or making a photograph, but it absolutely presents other interesting opportunities. My experience with design in a coding context has so far exclusively been with html and CSS, with the primary focus being on creating the layout and elements of a website, with some CSS animations sprinkled in. Using Processing forced me to approach designing with code at a much more granular level, and it gave me the opportunity to create something interesting purely for the sake of the composition(and also a good grade on the assignment obviously!). Thanks for reading.